
Revalving the suspension by Rob Barnum of Barnum's Pro Products. Check out Barnum's Pro Products website here.
Check out this first Picture of Barnum's new Airbox Mod for the XR650R. Stay tuned as we get this intalled!
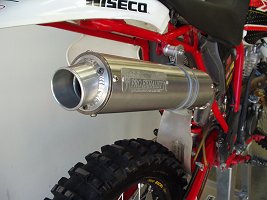
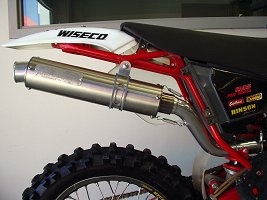
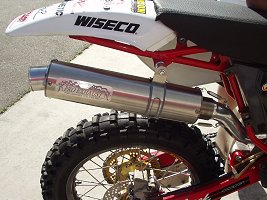
Check out some Pictures of Barnum's Pro Products XR400R pipe
Initial ride review
On Jan 25, 2002, I was able to personally go down to Rob's shop and watch him revalve my suspension front and rear and took a few photos along the way. I was very impressed with his knowledge of the XR650R and highly recommend his work to anyone who owns a 650 or any other motorcycle for that matter. Rob is an encyclopedia of motorcycle knowledge! I asked Rob about other suspension mods like gold valves. He said that they are good for older types of suspension but are not needed with the suspension on the XR650R because the forks and the shock have all of the pieces necessary to work, the valving stacks just need to be reworked. His attention to detail was amazing as he worked on my shock and then my forks. (See photos below) I had no idea that modern suspension was so complicated.
The next morning I was able to meet up with Rob and Ron Edmisten, another riding buddy, and we headed out to Lucerne Valley to ride. Wow, can Rob move! Rob held the number one plate for district 37 not too long ago so I was really happy that he would go riding with us. The suspension was much plusher in the initial stroke then firmed up nicely midstroke.
I can honestly say the work he did improved the ride on the
BRP. Going through woops at race speed is now just a twist of the throttle
away. No longer did I end up slowing to go through a bunch of wooped out sections
of jeep roads. After meeting with Rob and watching him work, I will never
trust anyone else to work on my bike! He is a class act and represents the
motorcycle industry very well!
Revalving the suspension
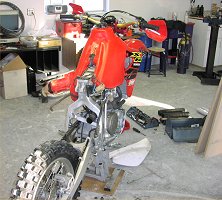
Step 1. Remove the rear subframe from the bike. Then remove the shock and the forks. If you are packaging them to ship, wrap the shock in bubble wrap then pack it up in one box with a bunch of appropriate packing material. With the forks, wrap each fork leg individually with bubble wrap then wrap them together in bubble wrap. You will probably have to build a box to ship the forks in. Build it heavy duty and use lots of strapping tape.
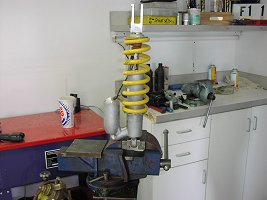
Step 2. Rob puts the shock in a large vise to disassemble the shock.
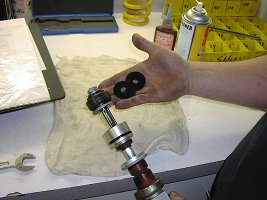
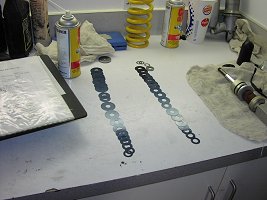
Step 3. After the shock is disassembled, Rob lays out all of the valve shims and takes inventory to see what's there. The shims are different diameters as well as thicknesses. On the left side of the photo below is a loose-leaf binder where Rob keeps notes on the arrangement of shims for different rider weight, riding style, type of riding, etc. Rob had me identify what I didn't like about the stock valving in the shock and then restacked the shims accordingly.
Step 4. After the shims were restacked to match my weight, riding style and the type of riding I do, Rob put the shock back together. While assembling the shock after filling with oil, Rob was careful to bleed all of the air out. Next, Rob charged the shock with Nitrogen to 180 psi. Then the last step was to put the spring back on the shock shaft. (Note: I am sure I left out some steps during the assembly of the shock, I just noted the few I remember.) Now the shock was ready to put back on the bike.
Step 5. Rob disassembles the forks to take an inventory. The shims and some of the other internals look somewhat like the internals of the shock. Rob keeps notes on the arrangement of shims for different rider weight, riding style, type of riding, etc. for the forks as well. Rob had me identify what I didn't like about the stock valving in the forks and then restacked the shims accordingly.
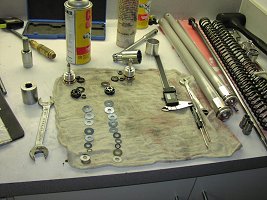
Step 6. Rob carefully inspects the fork internals to make sure there is nothing that will cause the valving to be inconsistant. Rob found some rust on the damper rods inside of each fork. Rob put the rods on a machine lathe and carefully polished the rust off.
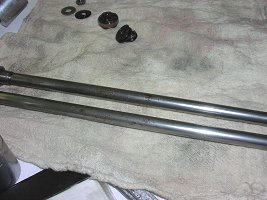
Step 7. Rob carfully reasembles each fork leg making sure to bleed out any air in the fork oil.
Step 8. Put the shock and the forks back on the bike and its time to ride!
Check out Barnum's Pro Products website here for more info.
Check out some Pictures of Barnum's Pro Products XR400R pipe: Stay tuned for pictures of his XR650R pipe!
Check out this first Picture of Barnum's new Airbox Mod for the XR650R. Stay tuned as we get this intalled!
Copyright © 1999-2009 XR650R.NET. All rights reserved.
XR650R.NET has been optimized for both MS Internet Explorer and Netscape Navigator, versions 4.0 and higher with a screen resolution of 1024x768.